Page 2 of 4
Re: DROV-bubbles rov
Posted: Feb 1st, 2015, 4:39 am
by dtrip
You are in the wrong forum. This is for homebuilt ROVs. Yours is professional !
Simply amazing.
Re: DROV-bubbles rov
Posted: Feb 2nd, 2015, 9:01 am
by Bubbles
So after four of my welds failed I weld again the four leaks and decide to change the test method.
I add a pressure gauge and fill the hull with water.

- image.jpg (100.33 KiB) Viewed 8628 times
I put compressed air from my compressor up to 8 bar(this is my compressor limit) in the hull and let it for 24 hours.

- image.jpg (81.6 KiB) Viewed 8628 times
After a day only one of my welds fail.

I have to do it again!!!

- image.jpg (48.16 KiB) Viewed 8628 times
Re: DROV-bubbles rov
Posted: Feb 2nd, 2015, 9:28 am
by Bubbles
PART TWO:Electronics
I couldn't imagine that all wiring is such a pain.
Since I have to seperate spaces in my hull I had to seperate the electronics.

- image.jpg (67.79 KiB) Viewed 8626 times

- image.jpg (103.97 KiB) Viewed 8626 times
At the front part I place the rov control board ,a step down converter ,lv filter and fuse for Gopro
Re: DROV-bubbles rov
Posted: Feb 2nd, 2015, 9:32 am
by Bubbles
And this is the front part for camera ,led board and on-off switch

- image.jpg (78.78 KiB) Viewed 8626 times
At the rear part I place a distribution board(so many wires

),a small fuse board for the three thrusters and control board and ESC with extra heat sink

- image.jpg (103.51 KiB) Viewed 8626 times

- image.jpg (95.76 KiB) Viewed 8626 times

- image.jpg (88.92 KiB) Viewed 8626 times
Next thing is to put them all together and see if everything works properly and make the battery canisters !!
Re: DROV-bubbles rov
Posted: Feb 2nd, 2015, 12:40 pm
by ROVER3D
yeah, looks great!

UV-active PVC?
Re: DROV-bubbles rov
Posted: Feb 2nd, 2015, 12:54 pm
by Bubbles
ROVER3D wrote:yeah, looks great!
UV-active PVC?
Yes.It was the only spare part I had

Re: DROV-bubbles rov
Posted: Feb 2nd, 2015, 1:13 pm
by ROVER3D
Maybe there is a new area of ROV-building. ROV case-modding!

Re: DROV-bubbles rov
Posted: Feb 7th, 2015, 2:58 pm
by fryslan76
Looks damm nice. I really need to improve my welding skills.
Re: DROV-bubbles rov
Posted: Mar 26th, 2015, 3:46 pm
by Bubbles
After a few tests and a lot of cracks at motor mount welds I decide to throw away the aluminium hull and make one from a solid piece of derlin.Aluminium lost all its properties after so much welding
I will keep the aluminium end caps modify the led lights and change only the hull.
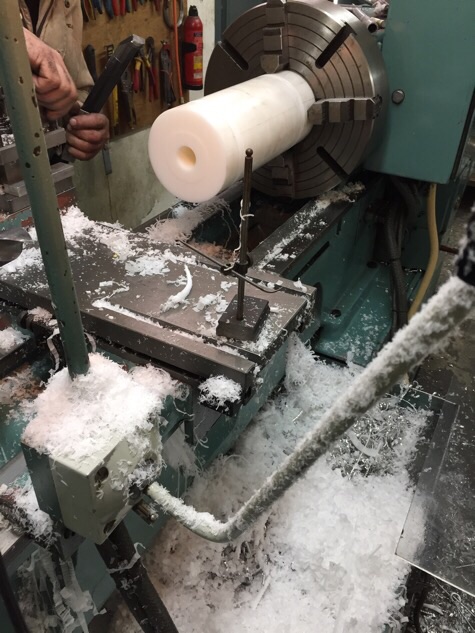
- image.jpg (106.93 KiB) Viewed 8494 times

- image.jpg (105.13 KiB) Viewed 8494 times
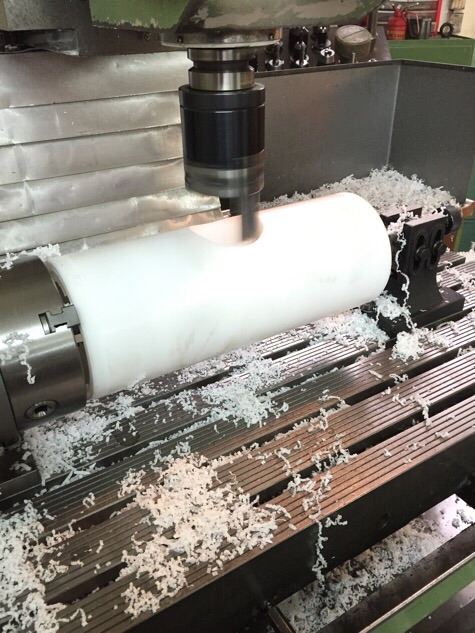
- image.jpg (111.07 KiB) Viewed 8494 times
So after four hours new hull is ready!!!I pressure test it and everything is ok!!!Plus I finished the battery canisters and led light modification

- image.jpg (94.94 KiB) Viewed 8494 times
Next thing is to figure out how to make a waterproof bulkhead penetrator for motors and lights since I cant use cable glands because I made wrong size threads at the hull

Re: DROV-bubbles rov
Posted: Mar 26th, 2015, 4:28 pm
by Bubbles
After I carried out several tests I finally decide how I will make my cable penetrators.All are based at sthone approach with few modifications.
I potted stip stranded wire in a metal gland with oring and pressure test it.Failed,the water pass through the wire jackets
Then I tried the same way but I solder stranded wires to make them solid and test it.Failed again,the water still pass through wire!
The last try was to take solid pieces of copper wire ,remove the jacket and make threads so epoxy could grab better on it.I solder then to the motor wires clean them and metal glands with acetone and pot them with epoxy.

- image.jpg (59.88 KiB) Viewed 8491 times

- image.jpg (53.75 KiB) Viewed 8491 times

- image.jpg (77.31 KiB) Viewed 8491 times

- image.jpg (51.48 KiB) Viewed 8491 times
After a pressure test at 8 bars for 24 hours the potted glands is perfect with no leak at all.

- image.jpg (66.39 KiB) Viewed 8491 times
So since this is a success I made my penetrators the same way.
I made threaded pieces of stainless steel since I cant use the metal gland shell and finished all the wire soldering.

- image.jpg (56.94 KiB) Viewed 8491 times
I use pieces of silicone jacket from rc wire so I can make enough space between solid wires for epoxy to pass easily

- image.jpg (36.48 KiB) Viewed 8491 times